How to Weld with a MIG Welder
To weld with a MIG welder, prepare clean metal, set the machine for the wire and metal, then keep the gun moving at a steady pace. Practice short beads on scrap before making a joint.
On this page (8 sections)
- What do you need to weld with a MIG welder?
- How do you set up a MIG welder?
- How do you prepare metal for MIG welding?
- How do you make your first MIG weld bead?
- How do you fix common MIG welding problems?
- How do you practice MIG welding safely?
- How do you use a MIG welding machine for a specific project?
- How do you know when to change your MIG welding technique?
To weld with a MIG welder, prepare clean metal, set the machine for the wire and metal, then move the gun steadily along the joint. Start with short beads on scrap, and use the machine manual to choose settings for your setup.
MIG welding feeds wire through a gun to create an arc between the wire and metal. The process can use shielding gas with solid wire or self-shielded flux-cored wire, so check which setup your machine supports before loading it.
What do you need to weld with a MIG welder?
You need a compatible MIG machine, the correct wire and shielding setup, clean metal, and protective gear. Read the manual before connecting the machine or changing its wire, polarity, or settings.
Use a welding helmet with the shade recommended for your work, welding gloves, nonflammable clothing that covers your skin, and closed footwear. Keep a fire extinguisher nearby, clear flammable items from the work area, and make sure ventilation is suitable for welding fumes.
A welding machine guide can help you choose a welding machine that matches your material and power source. If you're still learning the process, start with the basics of welding for beginners.
The BILT HARD 135A machine supports flux-core MIG, stick, and lift TIG modes; its TIG torch is not included. Its synergic control adjusts voltage and wire feed speed based on selected amperage.
How do you set up a MIG welder?
Set up the machine by matching the wire, polarity, and shielding method to the manual, then attach the work clamp to clean metal. Keep the power off while installing wire or making connections.
- Put the welder on a stable, dry surface with space around it for airflow.
- Check that the wire type and diameter match the drive rolls, liner, and contact tip.
- Install the spool and thread the wire according to the manual.
- Set polarity for the wire and process you plan to use.
- Connect shielding gas only when using a process that requires it.
- Attach the work clamp to bare, clean metal close to the weld area.
- Set the starting voltage and wire feed speed from the machine's chart or manual.
A MIG welder uses a wire spool and gun to feed filler wire to the arc. Learn what a MIG welder is if you want a closer look at its parts and how the process differs from other methods.
Don't guess at polarity or gas flow. The correct setup depends on the wire and process, and the wrong combination can make it hard to form a stable bead.
How do you set up a flux-core MIG welder?
A flux-core setup uses tubular wire that contains flux, and some wire is designed to work without shielding gas. Follow the wire and machine instructions for polarity, wire size, and settings.
A process that uses self-shielded flux-cored wire can suit outdoor work where wind would disturb shielding gas, though you still need to protect yourself and control fumes. See how to use a flux core welder for setup steps specific to that process.
How do you prepare metal for MIG welding?
Remove paint, rust, oil, and other coatings from the weld area, then clamp the pieces so they stay aligned. Clean metal makes it easier to see and control the weld puddle.
Use a grinder or approved cleaning tool to expose bright metal where the weld will go. Keep sparks away from flammable material, and wear eye and face protection when grinding.
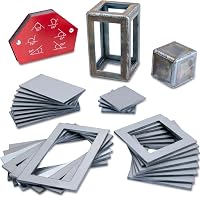
For practice, mild steel coupons let you focus on the arc and travel speed without cutting up a project part. The Hugbow kit has mild steel plates in several sizes and a welding magnet for holding two plates at an angle.
Check that the work clamp has a solid connection and that your gloves won't snag on the wire. If a coupon has sharp edges, handle and deburr it safely before welding.
How do you make your first MIG weld bead?
Make your first bead on flat scrap by bracing your hands, positioning the gun at the recommended angle, and moving at a steady speed. Begin with a short line so you can inspect the bead before trying a longer weld.
Hold the gun so you can see where the wire meets the metal. Keep the contact tip the distance from the work recommended by your manual, and avoid letting the nozzle touch the puddle.
Pull the trigger and move along the scrap without stopping in one spot. A slight push angle is common with solid-wire MIG, but use the wire maker's guidance for your specific wire.
Listen to the arc and watch the puddle. A steady, even sound and a bead with consistent width are useful clues, but they don't confirm the strength of a joint.
Make several short practice beads. Change only one setting or technique at a time, so you can tell whether wire speed, voltage, travel speed, or gun position caused the difference.
How do you fix common MIG welding problems?
Change one thing at a time after checking the wire, ground connection, and setup. Compare your bead with the machine's settings chart before adjusting controls.
- Wire stubs into the metal: Check the wire feed and voltage settings against the manual, and confirm the contact tip and wire are the correct size.
- Wire burns back to the tip: Review wire feed speed, voltage, and contact-tip condition, then make sure the wire can feed freely.
- The arc sounds harsh or uneven: Confirm the work clamp is connected to clean metal, inspect the wire path, and compare settings with the recommended starting point.
- The bead is tall and narrow: Check whether your travel speed is too fast or the gun angle is off. Practice at a steady pace on scrap.
- The bead is wide or piled up: Check for slow travel or excessive heat, then adjust one setting or your pace and compare another practice bead.
- Weld spatter builds up: Review your setup and travel technique. Learn how to identify and reduce weld splatter or spatter.
Stop if the machine shows an error or overheats, and follow the manual's instructions before restarting it. Don't keep welding through a problem you can't identify.
How do you practice MIG welding safely?
Practice on clean scrap in a clear, ventilated work area, and let the metal cool before handling it. Keep your helmet down before striking the arc and wear protective clothing that covers exposed skin.
Start by laying down straight beads on flat coupons. Then practice joining two pieces at a right angle, keeping them clamped in position and checking the fit before welding.
A beginner welding kit can make it easier to gather compatible supplies. Compare welding kits for beginners and choose one that fits the process and protective gear you need.
The Q-MING Soldering Iron Kit is for electronics and small soldering work, not arc welding. It includes a temperature display, soldering tips, stand, sponge, and solder wire.
Keep a log of the wire, material, settings, and results for each practice session. When you're ready to compare processes, read how to TIG weld to see how TIG setup and torch control differ.
How do you use a MIG welding machine for a specific project?
Use the machine's manual and wire instructions to set up for the project's metal thickness and joint, then practice on matching scrap. A short test bead can reveal setup issues before you weld the actual parts.
For a model-specific walkthrough, see how to use a Hobart Handler 140 MIG welder. The steps can differ across machines, so use your own manual for connections and controls.
Don't weld structural, pressurized, or safety-critical parts based on appearance alone. Those jobs call for a suitable welding procedure and qualified review.
How do you know when to change your MIG welding technique?
Change one variable at a time when practice beads show inconsistent width, poor tie-in, or frequent interruptions. Check setup first, then adjust your pace, gun position, or machine controls.
Choose a small set of clean coupons if you want to repeat the same bead or joint. For a multi-process welder, confirm that the selected mode matches the wire and shielding setup.
To weld with a MIG welder, match the wire and machine setup, clean and clamp the metal, and practice a steady bead on scrap. Use the manual's settings as your starting point, then refine one variable at a time as you learn to weld with MIG.
Frequently asked questions
What settings should I use on a MIG welder?
Use the chart in your welder's manual for the wire type, wire diameter, shielding method, and metal thickness. Start with its recommended voltage and wire feed speed, then make a short bead on scrap.
Adjust one control at a time if the arc sounds rough or the bead shape looks uneven.
Do you push or pull a MIG weld?
For many MIG welds with solid wire and shielding gas, a slight push angle helps you see the puddle and direct shielding gas over it. Follow your machine or wire maker's instructions, especially with flux-cored wire, since its recommended travel angle can differ.
Can a beginner learn to MIG weld?
Yes. Start with the machine manual, suitable protective gear, clean scrap metal, and short practice beads.
Learn to control the arc and travel speed before joining parts, and ask an experienced welder for help if you are unsure about the setup or safety.
What should a good MIG weld bead look like?
A practice bead should be reasonably even in width, with consistent ripples and a smooth tie-in along both sides. Appearance alone cannot prove a joint is strong.
For critical work, use the correct procedure and have the weld checked by someone qualified.