How to TIG Weld
To TIG weld, clean and clamp the metal, set up the torch and shielding gas, then hold a short arc while feeding filler metal in small amounts. Practice on scrap first and follow your machine and safety gear instructions.
On this page (8 sections)
- What do you need to TIG weld?
- How should you set up the workpiece and welder?
- How do you hold the torch and start the arc?
- When should you add filler rod?
- How can beginners practice TIG welding?
- Can you use a multiprocess welder for TIG?
- What common mistakes should you avoid?
- How do you know when your TIG weld is ready?
To TIG weld, prepare clean metal, set up the machine and shielding gas, then hold a steady arc and feed filler rod in small, regular additions. Practice the torch movement on scrap before welding a project, and follow the welder manual and safety instructions.
TIG welding gives you close control over the arc and filler, but both hands have separate jobs. One guides the torch while the other feeds rod, so short practice sessions help you build coordination.
If you're still choosing a process, start with our guide to welding for beginners or learn what a TIG welder is.
What do you need to TIG weld?
You need a TIG-capable welder, torch, shielding gas setup, work clamp, suitable tungsten electrode, and protective gear. Add clean base metal and the filler rod suited to the material and joint.
The torch, electrode, gas, and settings vary with the machine and metal. Check your welder's manual for setup instructions, compatible consumables, and any limits for the process.
Shielding gas protects the weld area from the surrounding air. A beginner setup commonly uses an argon cylinder and regulator, but use the gas and flow guidance specified for your machine and material.
Our guide to the best TIG welder gas tank can help you compare tank options.
Wear a welding helmet with the correct shade, gloves, and clothing that covers your skin. Work in a well-ventilated space, clear away flammable items, and keep bystanders away from arc light and sparks.
Is TIG welding the same as soldering?
No. TIG welding joins metal with an electric arc, while soldering uses a heated iron to melt solder onto a workpiece.
A soldering iron is for small electrical or craft tasks, not for TIG welding metal joints.
The Q-MING Soldering Iron Kit is a pen-style, corded tool with a ceramic heating element and an adjustable digital temperature display. It can suit small electronics repair or craft soldering, but it isn't a substitute for a TIG torch.
How should you set up the workpiece and welder?
Clean the joint, clamp the pieces securely, and confirm the machine settings from its manual before striking an arc. Remove oil, paint, rust, and coatings from the weld area with a method suited to the metal.
A stable workpiece lets you focus on torch movement rather than holding parts in place. Position the joint so you can see it clearly and rest your hands without touching hot or energized parts.
Attach the work clamp to clean metal as directed by the welder manual. Route the torch lead and gas hose so they won't catch on the workbench or pull your hand off course.
Set gas flow, electrode, polarity, and current according to the machine manual and the metal thickness and type. Don't copy a setting from a different machine without checking that it applies to your setup.
How do you hold the torch and start the arc?
Hold the torch at a slight angle toward the direction of travel, with the tungsten close to the work but not touching it. Follow your welder's instructions for starting the arc and keep the torch steady as the puddle forms.
Rest a hand or wrist where it can move smoothly along the joint. Keep the torch angle consistent and watch the puddle rather than the tip alone.
A short arc helps concentrate heat in the joint. If the tungsten touches the work or filler, stop and follow the manual's instructions for cleaning or replacing it before continuing.
How to TIG weld with steady movement
Move the torch at a pace that keeps the puddle even along the joint. Too much heat can widen the puddle; moving too fast can leave the weld thin or uneven.
Practice a few dry runs with the machine off. Trace the joint with the torch in the position you'll use, then repeat with the equipment set up and the arc started on scrap.
When should you add filler rod?
Add filler when the joint or welding method calls for extra metal. Feed the rod into the front edge of the puddle in small, repeated dips while keeping the torch steady.
Hold the rod at a shallow angle and keep its end inside the shielding gas area. Pulling it out of the gas can contaminate the hot tip, so use smooth, short movements.
The torch hand controls heat and travel; the filler hand controls how much metal enters the puddle. If the bead grows too tall or wide, reduce the amount of filler or adjust your pace according to your procedure.
Some close-fitting joints may be fused without filler, but that choice depends on the joint and material. Don't use a filler-free technique unless the joint design and welding procedure support it.
How can beginners practice TIG welding?
Practice on clean, flat scrap with short beads before attempting a project joint. Work on holding the arc and moving at a steady pace first, then add filler rod once your torch movement is more consistent.
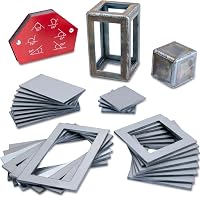
The Hugbow Welding Coupons set includes mild-steel plates in several sizes and a welding magnet for holding two plates at an angle. Its plates are intended for welding practice with TIG and other processes.
Keep practice pieces separate from finished work and let them cool before handling. Use the same material and joint style as your planned project when possible.
Don't judge progress by bead appearance alone. Check that the weld follows the intended joint, and ask a qualified instructor to review your setup and technique if you're learning without prior welding experience.
Can you use a multiprocess welder for TIG?
A multiprocess machine can work for TIG if it has the right TIG mode and compatible accessories. Confirm the machine's manual covers your intended process, material, and setup before buying or connecting a torch.
The BILT HARD 135A 3-in-1 IGBT Inverter Welder includes Flux Core MIG, Lift TIG, and Stick modes. Its product information says the TIG torch is not included, so account for that accessory separately.
This machine also supports MIG and Stick modes, which may help if you plan to learn more than one process. For a different process walkthrough, see how to weld with a MIG welder.
What common mistakes should you avoid?
Avoid dirty metal, a long or unsteady arc, inconsistent travel, and filler rod that leaves the shielding gas area. These habits make it harder to keep the puddle controlled and can affect weld quality.
If the weld looks uneven, stop and change one part of your technique at a time. Check the workpiece preparation, torch position, travel speed, and filler timing rather than making several machine adjustments at once.
TIG welding usually makes less spatter than some other processes, but a weld can still have defects or contamination. Learn the difference between weld splatter or spatter and other weld issues before deciding how to clean or repair a joint.
Can you TIG weld aluminum?
Yes, some TIG setups can weld aluminum, but the machine and torch settings must support the material. Aluminum needs clean preparation and a suitable procedure, so confirm the machine's manual before starting.
See our guide to how to weld aluminum for material preparation and process considerations. Don't assume that settings for steel will work for aluminum.
How do you know when your TIG weld is ready?
A finished bead should follow the intended joint without obvious gaps or breaks, but appearance alone can't confirm weld strength. Use the inspection method and acceptance criteria required for your project.
Let the work cool before handling it, and avoid touching the electrode, torch parts, or workpiece until they are safe. If the joint is structural or safety-critical, use a qualified welding procedure and have the work inspected by someone qualified.
For a first practice session, focus on clean preparation, steady torch travel, and controlled filler additions. Choose a TIG setup that matches your material and machine, then build skill on scrap before moving to a project.
Frequently asked questions
What do you need to TIG weld?
You need a TIG welder, a TIG torch with the right consumables, shielding gas, a work clamp, clean metal, and suitable protective gear. Filler rod is needed when the joint or technique calls for it.
Check your machine manual for the torch, gas, electrode, and setup requirements for your material.
Is TIG welding hard for beginners?
TIG welding takes practice because one hand controls the torch while the other feeds filler rod. Start with clean, flat scrap, learn to hold a steady short arc, and add filler only after you can move the torch at a consistent pace.
Practice under qualified supervision when possible.
Can you TIG weld without filler rod?
Yes, some tight-fitting joints can be fused without filler, but the joint design and material must suit that method. Filler rod is commonly used to add metal to the weld.
Follow a procedure suited to the material and joint instead of using filler-free welding as a shortcut.
Can a beginner use a multiprocess welder for TIG?
Some multiprocess welders include a Lift TIG mode, but that does not mean every accessory is included. Check whether the correct TIG torch and consumables are available, and confirm the machine's manual covers the material and process you plan to use.