How to Use a Flux Core Welder
To use a flux core welder, load compatible wire, connect the work clamp, set the machine for the wire and metal, then practice short, steady beads on clean steel. Wear proper protection and follow the welder and wire instructions.
On this page (7 sections)
- How do you set up a flux core welder?
- How do you feed wire and choose a starting setting?
- How do you make a first flux core weld?
- How should you protect yourself while welding?
- What problems can happen during flux core welding?
- When should you choose flux core instead of another process?
- How to use a flux core welder: what should you practice first?
To use a flux core welder, feed compatible wire, attach the work clamp, set the machine for your wire and steel, and practice short beads on scrap. Wear welding protection, clear the area of fire risks, and follow the machine and wire instructions.
Flux core welding joins metal with a continuously fed tubular wire that contains flux. Many self-shielded wires do not need a gas cylinder, which makes them useful for basic repairs and practice, but the wire label determines the setup.
How do you set up a flux core welder?
Match the wire, polarity, and machine settings to the metal before striking an arc. The welder manual and wire instructions should guide setup, because flux core machines and wires can differ.
Start with a clear, stable work surface and clean steel. Remove paint, rust, oil, and moisture from the joint area, and keep flammable items away from sparks.
Check that the machine is unplugged while you install wire or change connections. Set the drive roll and contact tip to suit the wire diameter, then feed wire through the gun as the manual directs.
Confirm polarity for the specific wire. Self-shielded flux core wires commonly use a different polarity arrangement from gas-shielded MIG wire, so don't rely on a remembered setting.
Attach the work clamp to clean metal close to the joint. Make sure the cable connections are secure and the gun liner and tip are suitable for the wire.
For a broader first pass at tools, workspace, and basic practice, see welding for beginners. If you are assembling a starter setup, compare a best welding kit for beginners guide.
What Is Flux Core Wire? The Short Answer
Flux core wire is tubular welding wire with flux inside its outer metal sheath. The flux helps protect the molten weld area, and some wire types are made for use without external shielding gas.
Wire type affects polarity, settings, and whether gas is needed. Read [What Is Flux Core Wire?
The Short Answer](/what-is-flux-core-wire/) before choosing a spool or changing the machine configuration.
How do you feed wire and choose a starting setting?
Use the wire diameter and metal thickness to find the machine's recommended starting settings. Begin with the welder chart or manual, then tune the result with practice beads.
Put the spool on the spindle in the direction shown in the manual. Trim the wire end cleanly, release the drive-roll tension as instructed, and guide the wire into the liner without kinks.
After closing the drive rolls, apply only enough tension to feed consistently. Too much pressure can deform the wire, while too little can cause slipping.
Set voltage and wire feed speed using the chart for the wire and material. If your machine has synergic control, use the process it specifies and check the manual for any needed adjustments.
The BILT HARD 135A 3-in-1 IGBT Inverter Welder offers a flux core MIG mode and a synergic control system that adjusts voltage and wire feed based on amperage.
Don't assume one setting works for every spool or thickness. Write down a setting that produces a steady arc on your scrap, then adjust in small steps if the wire stubs, burns back, or makes an erratic bead.
How do you make a first flux core weld?
Hold the gun at a steady angle, keep a short stickout, and move at a consistent pace. Start with simple beads on flat scrap before trying corners or a finished project.
Clamp the work so it cannot shift. Rest your gloved hand or forearm where it stays clear of hot metal, and position the gun so you can see the joint through your helmet.
Pull the trigger briefly to start the arc, then travel along the joint without stopping. Use the wire and machine maker's guidance for gun angle and stickout, since the right technique can vary.
A bead that is too narrow, tall, or uneven can point to travel speed, feed, or voltage that needs adjustment. Change one setting at a time and make another short practice bead.
Let the weld cool before touching it, and remove slag with a suitable brush or chipping tool while wearing eye protection. Inspect the bead for gaps, holes, or poor tie-in before moving to a new joint.
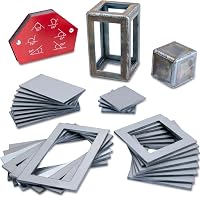
The Hugbow 40 PCS Welding Coupons set includes 11-gauge mild steel plates in several sizes and a welding magnet for holding plates at an angle.
Use coupons for controlled practice rather than assuming a bead on thin scrap will transfer directly to thicker steel. Secure the pieces, and check the magnet's hold before welding near it.
How should you protect yourself while welding?
Wear a welding helmet, gloves, and protective clothing, and keep sparks away from people and flammable materials. Welding arcs can harm eyes and skin, while hot metal and slag can cause burns.
Use a helmet with a suitable shade for the process and current range, plus safety glasses underneath when chipping slag. Cover exposed skin with flame-resistant clothing and use gloves made for welding.
Work where fumes can move away from your breathing zone, with ventilation appropriate for the material and location. Don't weld coated or unknown metal until you know what it is and how it should be handled.
Keep a suitable fire extinguisher nearby and watch the area after welding for smoldering material. Review the welding helmet and protective gear guide for help choosing eye and skin protection.
For safe wire handling and spool changes, see MIG wire welding safety. Keep the machine disconnected while changing wire or making internal adjustments.
What problems can happen during flux core welding?
Most beginner problems come from mismatched settings, poor wire feeding, dirty metal, or inconsistent movement. Pause, let the work cool, and check one cause at a time.
If the wire pushes the gun back or stubs into the work, the feed may be too fast or voltage too low for the setup. If the wire burns back toward the tip, feed may be too slow or voltage too high.
Spatter, porosity, or a rough bead can come from contamination, incorrect polarity, poor technique, or unsuitable wire. Clean the joint and recheck the wire instructions before changing settings.
If wire will not feed smoothly, check that the spool turns freely and that the wire is not tangled or pinched. Inspect the contact tip and drive rolls for the size and condition recommended by the manual.
Don't keep welding through an unstable arc. Stop and check for loose connections, a damaged gun cable, or machine fault indicators.
When should you choose flux core instead of another process?
Flux core suits wire-fed welding where a self-shielded wire and simple setup fit the job. A MIG process uses a solid wire and shielding gas in many common setups, while TIG uses a separate tungsten electrode and filler as needed.
Flux core can be a practical choice for outdoor work when the wire is made for that use, but wind and site conditions still matter. Check the wire guidance and protect the work area from drafts.
If you want to compare the related wire-fed process, read how to weld with a MIG welder. For a slower process that uses a torch and separate filler, see how to TIG weld.
A portable welder guide can help if you need to move a machine between work areas. See [What Is a Portable Welder?
A Quick Guide](/what-is-a-portable-welder/) before choosing equipment around transport needs.
The Q-MING Soldering Iron Kit is for small electronics and circuit-board work, not for joining structural steel with a flux core welder.
How to use a flux core welder: what should you practice first?
Practice straight beads on clean scrap, then move to simple lap and T-joints once your arc is steady. Keep notes on wire, polarity, settings, and the result so you can repeat a useful setup.
Choose coupons or offcuts close to the thickness of your project. Clamp them firmly, weld a short bead, let it cool, remove slag, and inspect the result before making another pass.
Pick a beginner practice set if you want several small steel pieces for repeat attempts. Choose a machine with flux core support when that process matches your intended work, and use a soldering iron only for electronics tasks.
The safest starting point is a short bead on clean scrap with the right wire, polarity, and protection. Once that bead is steady, build skill by changing one variable at a time and checking each result.
Frequently asked questions
What is a flux core welder?
A flux core welder feeds tubular wire with flux inside through a welding gun. The arc melts the wire and base metal, while the flux helps shield the weld pool.
Many flux core setups use no separate shielding gas, but check the wire label and machine instructions because wire types and setup needs differ.
Do you push or pull when flux core welding?
Many self-shielded flux core setups use a drag or pull angle, with the gun pointed back toward the completed weld. The correct direction can vary by wire type and manufacturer guidance, so follow the wire and machine instructions and confirm with practice beads before welding a project.
Does flux core welding need gas?
Self-shielded flux core wire is designed to work without an external shielding gas supply. Some flux-cored wires use shielding gas, so check the wire label and instructions before setup.
Use only the wire type supported by your welder and its polarity configuration.
How do you set a flux core welder?
Start with the machine settings recommended for your wire diameter and metal thickness, then adjust by making short practice beads on scrap of the same material. Check the manual for polarity, voltage, and wire feed guidance.
A smooth arc and consistent bead are better signs than copying a setting from another machine.